A blog commenter recently asked how to clean a RollerMouse Free, so I reached out to Contour Design for some guidance. A tech support guy from there sent me some clear and helpful instructions, which he also kindly permitted to be posted here for future reference.
IMPORTANT NOTE: Do not open your RollerMouse Free if it’s still in warranty. You will 1) Void the warranty, and 2) Waste your own effort doing something you could get someone else to do for you. (I try especially hard never to make that second mistake.)
ANOTHER IMPORTANT NOTE (and you thought we were done?): Try spraying compressed air into the RollerMouse before attempting to open and clean the thing. It almost certainly won’t hurt, and it might help. See my above note on wasting work – not to mention taking unnecessary chances.
The procedure
Did you read the notes and warnings above? No? Go ahead, I’ll wait.
Back? If you’re sure your RollerMouse is out of warranty and you promise you’ve tried compressed air, this is the procedure of last resort.
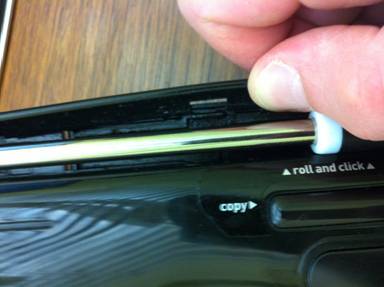
Step 1: Open up the RollerMouse unit
After all the obvious screws are out, there are these 2 hidden ones to remove. There is on rubber pad on the underside that is shorter than all the others. Peel that back and you’ll find these screws under it.

The front of the unit should open up now without a problem. But will still be held together by some clips on the back.
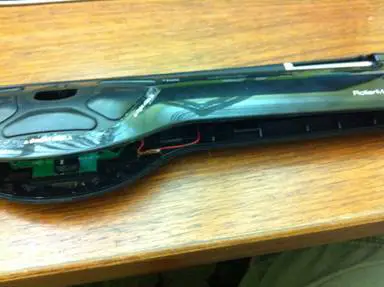
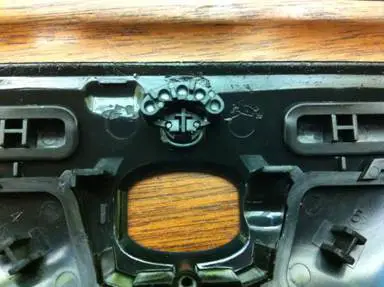
I find it easiest to pull these apart by pushing back on the flexible plastic piece away from the main body of the unit. There’s about 6 of them I think. After a few of them are loose, it should come apart rather easily.
One thing to be aware of when taking off the top case is under it are 3 small pieces of plastic that fit together for the cursor speed button and lights. They can fall out easily as they are not held in by anything.
Step 2: Remove the RollerBar
The open and exposed unit.
The ribbon cable to the left of the scroll wheel is where the sensor is. You’ll have to remove that metal bar, which is one complete piece.
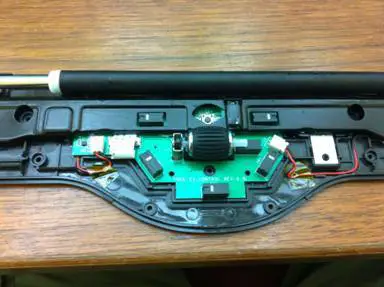
These small metal dowels, one each on the right and left sides, hold the roller bar in place. They can be pulled right up with a little force. You may see the dowel on the left side has a ground wire soldered to it, depending on what version you have. If it is there, be careful pulling up that dowel so that the ground doesn’t come loose.
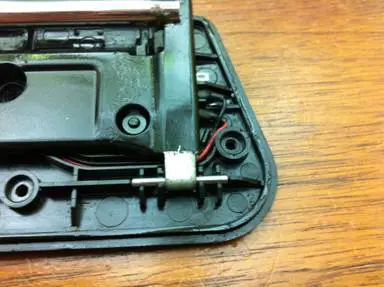
Now you can roll back that whole metal bar. You may see this ribbon cable, or it may be a little thinner. There’s 2 different types of sensors that they use. The ribbon cable comes out and can be placed back easily. The small black bar where it’s plugged in pulls up or out (two version of that also) to release it. You’ll want to remove the two screws to get at the sensor. They tend to be in very tight and this is the most likely place where something may go wrong. You might strip or break a screw.

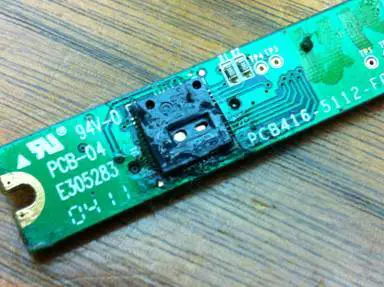
Step 4: Clean the sensor
Typically, a sensor will not get this dirty. But you can see why this one wasn’t working correctly. Your sensor will either look like this, or look like a plain round lens.
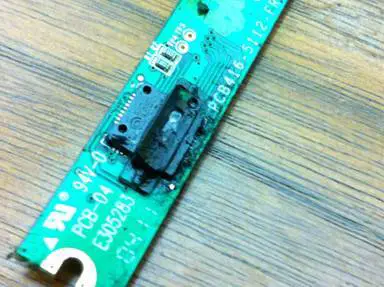
If you do have this type of sensor, the little plastic piece over the sensor comes off. I would avoid using rubbing alcohol on this piece at first. Use the compressed air and blow it out. The other plastic piece, get a q-tip and some rubbing alcohol and clean that off, top and bottom side. If black rubs off on the q-tip, that’s fine. They paint that plastic piece black so the sensor stays hidden when its assembled.
If you must, you can use a bit of rubbing alcohol and the q-tip on the sensor. But I would only try that after testing it out again after the plastic cap has been cleaned.
Step 5: Put it back together
Reverse these steps to reassemble. Two things to keep in mind during reassembly:
- If you lose the ability to click with the bar after it’s all back together, something isn’t pressed down enough. Possibly tighten the screws, or a wire isn’t in its track.
- Also, the clips that hold the back plastic part on might need a little work to set back in. Squeeze it together tightly, they will latch back on, but you might have to play with it a bit.
That’s it! Thanks again to Contour Design tech support for providing these instructions – and remember, use them only if your RollerMouse is out of warranty and you’ve already tried the simple compressed-air cleaning fix.

switch to ergo products has completely eliminated any pain or discomfort despite decades of crazy hours behind screens. I hope you too weave in a bit of ergo into your lives.
- Your Complete Guide To The Best Ergonomic Kneeling Chairs - March 25, 2024
- 5 Best Ergonomic Wine Bottle Openers - March 4, 2024
- Handshoe Mouse Review - January 23, 2024